Alright, you already read what tools and supplies you will need, now lets move on to the next steps. Are you doing this for yourself or for a company? Are you getting paid? You need to give that company an accurate estimate. In order for you to do this, it would be best if you had a PDF floor plan of their office. If you don’t have a some kind of floor plan, you might as well make a quick one. You are going to want an accurate estimate. I would recommend billing them for the time it takes to properly quote them (especially if you have to manually measure the office). If this is a leased space, the building manager may have a floor plan. If for some reason there isn’t a floor plan to scale, pick up a long tape measure. I would recommend at least the 300 feet tape measure because 28 feet more and you’re exceeding CAT6’s length limitations. With some graph paper or some office layout software scratch out a rough draft of their office (to scale). You will want to walk around and take note of where they want new runs, where CAT5 is being replaced with CAT6 and where lines are being removed. Keep in mind obvious limitations and avoid being parallel to power when possible. You will also want to take a look at how the building is constructed. Are the studs metal or wood? Metal beams often have access holes or tabs that can be lifted to run wire. With wood you will have to drill access holes. All of this will cut into your time. If you are replacing old wire you’re probably in luck. Sometimes the holes may not always be wide enough. Just estimate to the best of your abilities. You don’t want to tear the place apart getting accurate measurements, you just want to spend a little time to save yourself in the end. Something else that is also extremely important, measure the height of the ceilings. This will add to your cable lengths and will certainly add to your estimate.
Once you have a properly created a PDF floor map with termination locations marked use a program called Foxit Reader to quickly measure distances. Make sure to set the scale to equal your drawing.
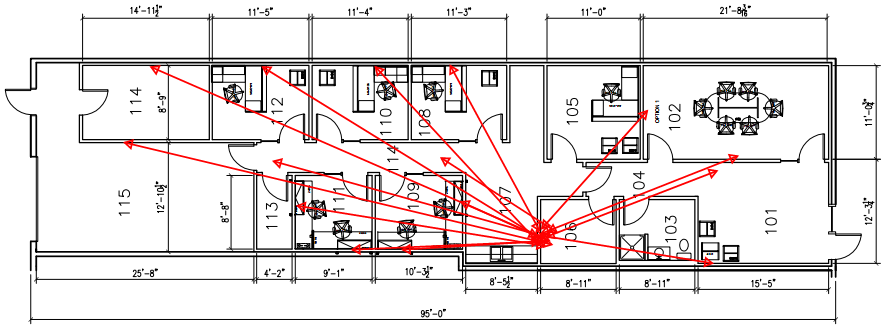
At this time I create an Excel or Google document that looks like this:
| Room | Distance | Drops | Total Distance | Ceiling Hieght | |
| Entrance 101 | 20.36 | 1 | 38.36 | 9 | |
| 102 A | 24.7 | 1 | 42.7 | ||
| 102 B | 18.47 | 4 | 145.88 | ||
| Office 105 | 18.74 | 4 | 146.96 | ||
| Office 108 | 21.92 | 4 | 159.68 | ||
| Office 109 A | 9.71 | 4 | 110.84 | ||
| Office 109 B | 16.05 | 4 | 136.2 | ||
| Office 110 | 28.25 | 4 | 185 | ||
| Office 111 A | 22.54 | 4 | 162.16 | ||
| Office 111 B | 29.32 | 4 | 189.28 | ||
| Office 112 | 39.17 | 4 | 228.68 | ||
| Backroom 114 | 50.88 | 2 | 137.76 | ||
| Garage 115 | 51.44 | 2 | 138.88 | ||
| Wireless 1 | 18.47 | 1 | 36.47 | ||
| Wireless 2 | 16.08 | 1 | 34.08 | ||
| Wireless 3 | 34.92 | 1 | 52.92 | ||
| 45 | 1945.85 |
From here I have each location (room) defined as well as the distance. The distance automatically adds in the ceiling height. From here you input all of your drops and locations and you have your total length. Now you know how much CAT6 you will need for this job. You can also copy your work onto another worksheet and alter the amount of drops per office. This is a quick way to provide a very detailed and accurate estimate. The next part is something you need to figure out for yourself. How are you going to charge the customer? Do you charge per drop or per foot? Depending on your location companies are charging as much as $400 per drop. This is completely up to you. Just as long as you cover your costs. I would not do it for less than $1.50 a foot. That is an extremely cheap price (this is only if its an easy job, you like the customer, or you’re hurt for cash). You will make money, but you will wish you asked for more. Running cable is hard work, make sure you are compensated appropriately. You also need to charge for your equipment installations. I would suggest that you make another excel sheet to spell out all your additional expenses (patch panel, network rack, cover plates, patch cables, switches, battery backup) and make sure you are estimating proper hours for all the punch downs, testing, labeling, and of course running of cable.
So lets run some cable!
I’m sure there are several ways you can run cable. I am going to go through the only two I can think of using. The first way, the cable already exists. Lets just say you are replacing CAT5 with CAT6 (or maybe a faulty wire). First you will want to use your tester and make sure that where you are pulling matches start and finish. Use your toner and trace the cables. If you are unsure, test the pairs of the cables in question. Once you have proven that you have the right wire on both ends, secure new wire to one of the ends. If you are replacing a single run with two runs, hopefully you have two spools of wire (if you only have one spool but need two runs use a pole rope). Using duct tape wrap two new runs to this old CAT5 you have already pulled from its punch down panel or port. Wrap this as tightly and securely as you possibly can. You will also want to take this time to mark one of the wire to distinguish the two new cables. Hopefully you have a partner helping you. This will really speed up the wiring process. One person will be feeding wire and the other will be gently pulling. There are so many things that it can get stuck on even in a drop ceiling construction building, so take your time. If you manage to pull the old wire out and away from the new runs, you will be creating more work for yourself. Fishing new line through a whole in the wall can be a real challenge. I can’t stress enough to secure your new line tightly to the old line. If something gets snagged get up on a ladder and find out what is holding you back. Don’t keep pulling. The wire will give (or worse, something else gives). This is where having two ladders and 2-way radios is very helpful. When you finally make it through pull the new line at least three feet out of its opening. It’s always good to have a little extra on both ends so you never cut yourself short. You also don’t want this run to be necessarily tight. There is no need to put stress on the cable.
The other way you would run a wire is if its a brand new building with new wire to be run. You would want to use a cable snake. The snake is handy because it wont tangle up easily. It makes it possible to guide the flimsy wire through small and tight places. If you are running wire in a drop ceiling with enough room, you can probably toss a coil of cable in the general direction of the future termination, then finish the job with the snake.
Often times a building will have whats called a firewall in the construction of the walls. If that’s the case you will need a special extra long drill bit. A firewall is essentially a horizontal 2 by 4 that stops a fire from spreading as quickly. These are great to have, but extremely difficult when running wire. What you will want to do in this case is look for a location to run all or the majority of your runs up into the attic, then move down (or in the basement and up, whatever makes sense). That way you are not constantly drilling. I would much rather use more cable than be drilling holes all day for the project. Especially if there are firewall beams hidden in the walls. Just think about that before planning our your cable runs. Time is money, and your time is much more valuable than a few hundred extra length of CAT6
I can not stress enough how important it is to turn power off in the areas you are running wire. With that being said, I would recommend the use of flashlights. Headlamps are the absolute best thing. You can not have enough flashlights!
That concludes today’s lesson, next I will tell you about punching down your runs, and testing those cables.